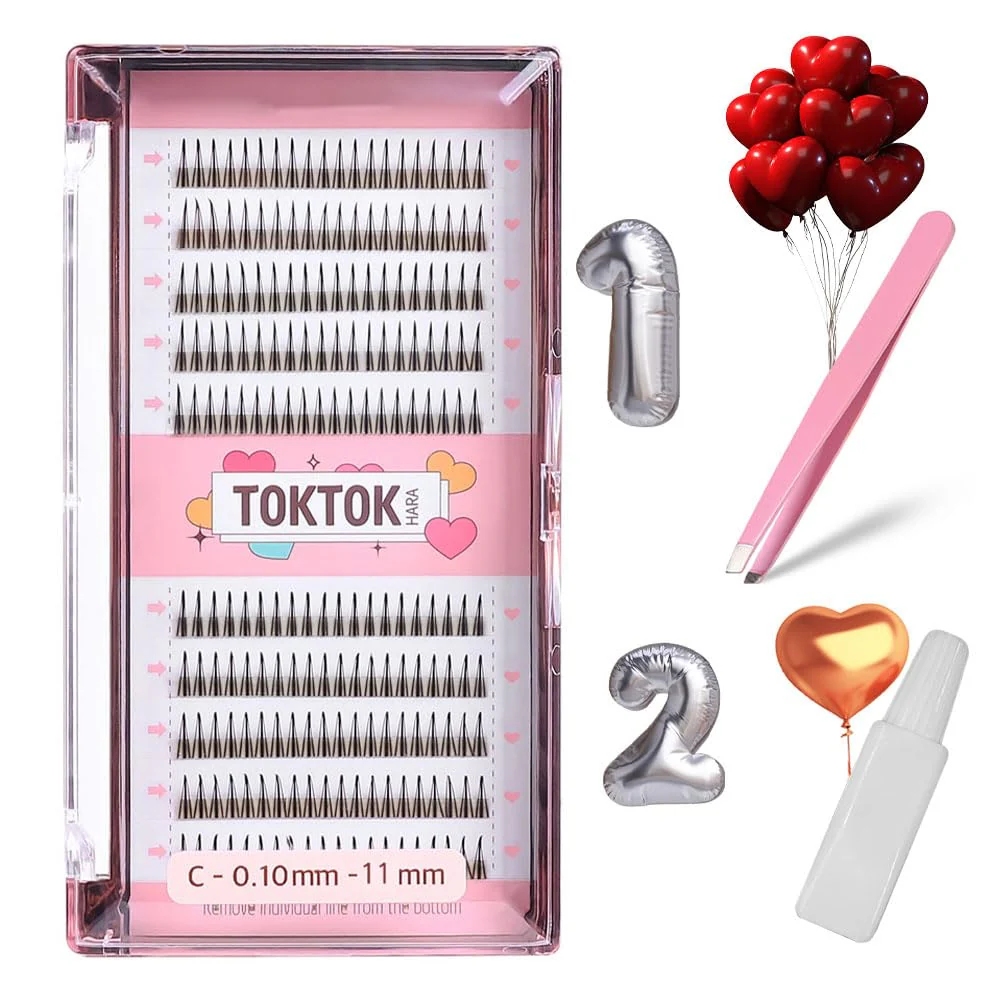
Coringco W Eyelash Gift Set + Tweezer + Glue 1g
Description:
It fills the gaps in your eyelashes.
It will give you a perfect idea of what you want to emphasize.
The lashes are not thick and light, so they are indistinguishable from your own lashes.
It's not heavy even if you wear it for a long time, and it's very easy because it doesn't feel like a foreign object.
The moment I put it on, I knew it was lighter than the feathers! You can put more on it wherever you like, so it feels like DIY!
How To Use:
Step 1: Preparation
Curl your lashes: Use an eyelash curler to lift your natural lashes. This creates a better base for the clusters to sit on.
Optional Mascara: You can apply a thin layer of mascara beforehand if you want a more dramatic look, but for the most natural "K-pop idol" style, many prefer to apply lashes to bare, curled lashes.
Step 2: Preparing the Lash Cluster
Pick up the lash: Use the provided tweezer to gently grab the middle or top part of a W-shaped lash cluster and lift it out of the tray. Tip: Be careful not to pull from the very tip to avoid damaging the shape.
Apply glue: Dip the root (base) of the lash cluster into a small drop of the provided 1g glue. Alternatively, apply a tiny amount of glue directly to the base of the cluster.
Wait for tackiness: Wait about 10–15 seconds until the glue becomes slightly transparent and tacky. This is the key to a secure hold.
Step 3: Application (The "Under-Lash" Technique)
Position the mirror: Place your mirror slightly below your chin so you are looking downward.
Apply under your lashes: Gently lift your eyelid with one finger. Place the lash cluster underneath your natural lashes, about 1mm away from the waterline (avoid touching the wet part of your eye/waterline to prevent irritation).
Sequence: Start from the center of the eye, then move to the outer and inner corners.
10mm: Recommended for the inner corners.
11mm/12mm: Recommended for the center and outer corners for a winged or open-eye effect.
Step 4: Finishing Touches
Secure the bond: Use the tweezers to gently squeeze your natural lashes and the false lashes together.
Check the angle: Ensure all clusters are aligned. The glue will dry clear, leaving a seamless finish.
Ingredients:
Acrylates/Ethylhexyl Acrylate Copolymer, Propylene Glycol, Aqua, Phenoxyethanol, Ethylhexylglycerin
Glue: Styrene/Isoprene Copolymer, Mineral Oil, Rosin, Pentaerythrityl Rosinates, Hydrogenated Poly(C6-20 Olefin), Camellia Sinensis Leaf/Stalk Extract
More Images

Coringco W Eyelash Gift Set + Tweezer + Glue 1g
Description:
It fills the gaps in your eyelashes.
It will give you a perfect idea of what you want to emphasize.
The lashes are not thick and light, so they are indistinguishable from your own lashes.
It's not heavy even if you wear it for a long time, and it's very easy because it doesn't feel like a foreign object.
The moment I put it on, I knew it was lighter than the feathers! You can put more on it wherever you like, so it feels like DIY!
How To Use:
Step 1: Preparation
Curl your lashes: Use an eyelash curler to lift your natural lashes. This creates a better base for the clusters to sit on.
Optional Mascara: You can apply a thin layer of mascara beforehand if you want a more dramatic look, but for the most natural "K-pop idol" style, many prefer to apply lashes to bare, curled lashes.
Step 2: Preparing the Lash Cluster
Pick up the lash: Use the provided tweezer to gently grab the middle or top part of a W-shaped lash cluster and lift it out of the tray. Tip: Be careful not to pull from the very tip to avoid damaging the shape.
Apply glue: Dip the root (base) of the lash cluster into a small drop of the provided 1g glue. Alternatively, apply a tiny amount of glue directly to the base of the cluster.
Wait for tackiness: Wait about 10–15 seconds until the glue becomes slightly transparent and tacky. This is the key to a secure hold.
Step 3: Application (The "Under-Lash" Technique)
Position the mirror: Place your mirror slightly below your chin so you are looking downward.
Apply under your lashes: Gently lift your eyelid with one finger. Place the lash cluster underneath your natural lashes, about 1mm away from the waterline (avoid touching the wet part of your eye/waterline to prevent irritation).
Sequence: Start from the center of the eye, then move to the outer and inner corners.
10mm: Recommended for the inner corners.
11mm/12mm: Recommended for the center and outer corners for a winged or open-eye effect.
Step 4: Finishing Touches
Secure the bond: Use the tweezers to gently squeeze your natural lashes and the false lashes together.
Check the angle: Ensure all clusters are aligned. The glue will dry clear, leaving a seamless finish.
Ingredients:
Acrylates/Ethylhexyl Acrylate Copolymer, Propylene Glycol, Aqua, Phenoxyethanol, Ethylhexylglycerin
Glue: Styrene/Isoprene Copolymer, Mineral Oil, Rosin, Pentaerythrityl Rosinates, Hydrogenated Poly(C6-20 Olefin), Camellia Sinensis Leaf/Stalk Extract
Product Information
Product Information
Shipping & Returns
Shipping & Returns
Description
Description:
It fills the gaps in your eyelashes.
It will give you a perfect idea of what you want to emphasize.
The lashes are not thick and light, so they are indistinguishable from your own lashes.
It's not heavy even if you wear it for a long time, and it's very easy because it doesn't feel like a foreign object.
The moment I put it on, I knew it was lighter than the feathers! You can put more on it wherever you like, so it feels like DIY!
How To Use:
Step 1: Preparation
Curl your lashes: Use an eyelash curler to lift your natural lashes. This creates a better base for the clusters to sit on.
Optional Mascara: You can apply a thin layer of mascara beforehand if you want a more dramatic look, but for the most natural "K-pop idol" style, many prefer to apply lashes to bare, curled lashes.
Step 2: Preparing the Lash Cluster
Pick up the lash: Use the provided tweezer to gently grab the middle or top part of a W-shaped lash cluster and lift it out of the tray. Tip: Be careful not to pull from the very tip to avoid damaging the shape.
Apply glue: Dip the root (base) of the lash cluster into a small drop of the provided 1g glue. Alternatively, apply a tiny amount of glue directly to the base of the cluster.
Wait for tackiness: Wait about 10–15 seconds until the glue becomes slightly transparent and tacky. This is the key to a secure hold.
Step 3: Application (The "Under-Lash" Technique)
Position the mirror: Place your mirror slightly below your chin so you are looking downward.
Apply under your lashes: Gently lift your eyelid with one finger. Place the lash cluster underneath your natural lashes, about 1mm away from the waterline (avoid touching the wet part of your eye/waterline to prevent irritation).
Sequence: Start from the center of the eye, then move to the outer and inner corners.
10mm: Recommended for the inner corners.
11mm/12mm: Recommended for the center and outer corners for a winged or open-eye effect.
Step 4: Finishing Touches
Secure the bond: Use the tweezers to gently squeeze your natural lashes and the false lashes together.
Check the angle: Ensure all clusters are aligned. The glue will dry clear, leaving a seamless finish.
Ingredients:
Acrylates/Ethylhexyl Acrylate Copolymer, Propylene Glycol, Aqua, Phenoxyethanol, Ethylhexylglycerin
Glue: Styrene/Isoprene Copolymer, Mineral Oil, Rosin, Pentaerythrityl Rosinates, Hydrogenated Poly(C6-20 Olefin), Camellia Sinensis Leaf/Stalk Extract